

OWNER’S MANUAL
THE ART OF START™
INSTALLER TERMS OF USE
Automotive Data Solutions Inc. (“ADS”) products are strictly intended for installation by Certified Technicians who are employed by a registered business specialized in the installation of automotive aftermarket electronics products. Prior to beginning installation of an ADS product in a vehicle, it is the Certified Technician’s responsibility to review the most current Product Guide, Install Guide and vehicle-specific notes available in Weblink®. ADS is not responsible for any damages whatsoever, including but not limited to any consequential damages, incidental damages, damages for loss of time, loss of earnings, loss of profit, commercial loss, loss of economic opportunity and the like that may or may not have resulted from the use, misuse, improper installation or operation of its products. Purchasers sole contractual remedy is refund of the purchase price of the ADS product(s). ADS reserves itself the right to suspend any Weblink® account without notice and decline to offer technical support to non-Certified Technicians, non-compliant Certified Technicians or end users.
END USER TERMS OF USE
ADS products are designed to remote start vehicles from a distance. In order to ensure your iDatastart system meets all safety regulations and operates as intended by the manufacturer, please follow the usage recommendations below:
• DO NOT use this product for any purpose other than its intended usage.
• DO NOT remote start a vehicle in an indoor or enclosed area (i.e. garage). Exhaust fumes are extremely dangerous and can cause personal injury or death. Install carbon monoxide detectors in every living area that can be exposed to vehicle exhaust fumes.
• DO NOT remote start a vehicle while it is being serviced. Follow the Valet Mode procedure as outlined in your Owner’s Manual.
• DO NOT remote start a vehicle in gear.
• DO NOT remote start a vehicle with the key in the ignition.
• DO NOT remote start a vehicle left unattended with open windows, unlocked doors or open convertible top.
• DO NOT allow children handle or operate long range remotes.
• ALWAYS engage your emergency brake prior to exiting your vehicle. This may limit motion if the vehicle is accidentally started in gear.
• AVOID remote starting your vehicle while passengers or pets are on board. This may increase the risk of shifter being put in gear after vehicle has been remote started.
• AVOID parking your vehicle on an inclined surface or an area surrounded by obstacles. For manual vehicles, ALWAYS ensure the Reservation Mode sequence, as outlined in your Owner’s Manual, is correctly engaged prior to the next remote start.
• AVOID delaying the inspection of your iDatastart system in the event of malfunction. Immediately contact a Certified Technician to ensure that installation or defective equipment is properly addressed.
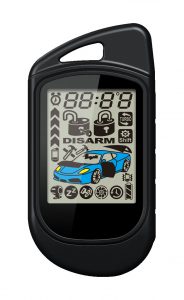
| REMOTE MODEL | TR2550A |
|---|---|
| Technology | FM 2-WAY |
| Max. Range | 3000 feet |
| Buttons | 5 |
| Transmit Confirmation (TX) | Chime |
| Receive Confirmation (RX) | LCD icon + Chime + Vibration |
| Batteries Required | 2 x CR2450 |
| Avg. Battery Life | 8-15 months |
| Warranty | 1 year |
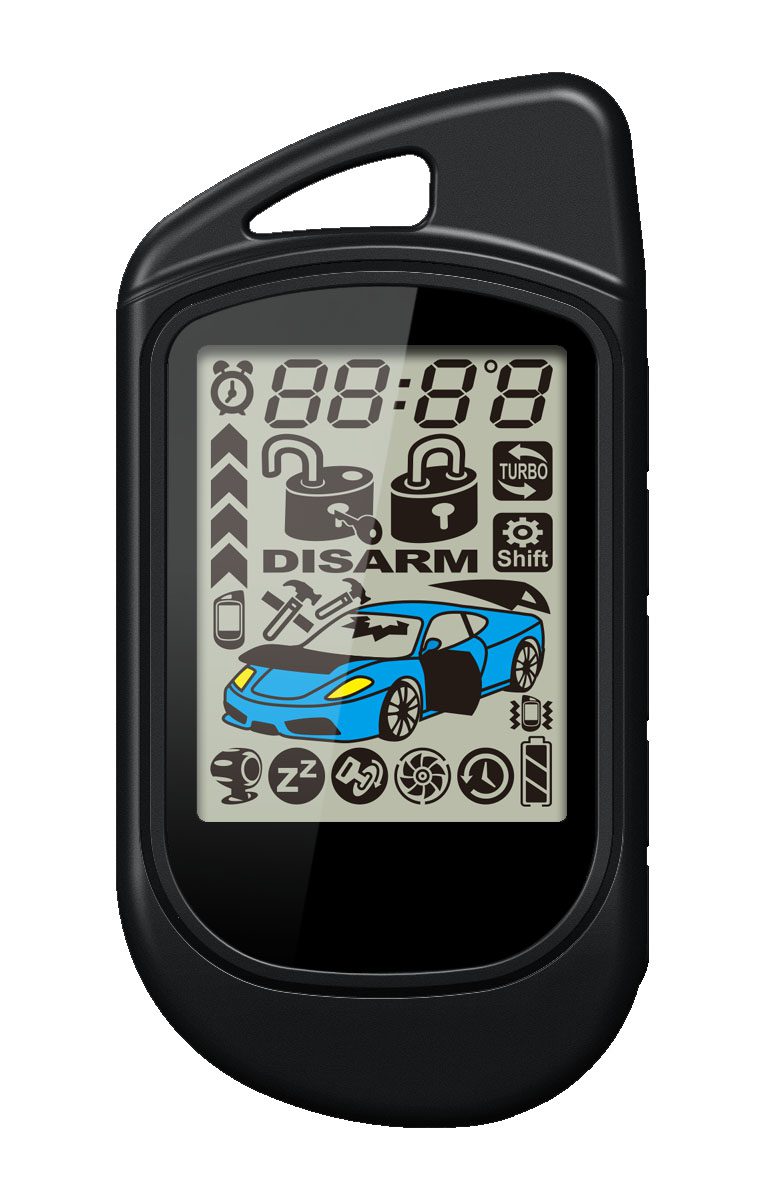
Your iDatastart TR2550A LCD remote can display several icons following a command (button press) or command notification. Please take a moment to familiarize yourself with their descriptions below:

| ICON | DESCRIPTION |
|---|---|
| Lock | |
| Unlock | |
| Alarm Armed | |
| Alarm Disarmed | |
| Panic / Alarm Triggered | |
| Engine Key Started / Remote Started | |
| Shock Sensor Disabled | |
| Shock Sensor Triggered | |
| Valet Mode | |
| Turbo Mode | |
| Battery Level | |
| Time or Engine Runtime, or Temperature or Error Codes or Other | |
| Door Open | |
| Trunk Open | |
| Hood Open | |
| Vibration Mode | |
| Transmitting | |
| Weather Start Mode Activated | |
| Ignition On | |
| Timer Alarm |
In order to get the most out of your iDatastart remote, please take a moment to get acquainted with the following commands and confirmations below:
NOTES:
1. All functions must be enabled by an Authorized Dealer during installation to be functional on remote
2. Non-highlighted icons = Press & release button
3. Highlighted (grey) icons = Press & hold button for 2.5 seconds
4. Coma (,) between icons = Press buttons one after the other
5. Plus (+) between icons = Press buttons together
6. Timeout between each button press = 3 seconds
7. Function* = Available in 2nd Car Mode
8. 3 chirps following a remote command = Option not available. Contact your Authorized Dealer.
| COMMAND | Power ON Remote |
|---|---|
| BUTTON | |
| DESCRIPTION | Turns remote on. |
| COMMAND | Power OFF Remote |
|---|---|
| BUTTON | |
| DESCRIPTION | Turns remote off to save battery life. |
| COMMAND | Lock & Arm* |
|---|---|
| BUTTON | |
| DESCRIPTION | Secures your vehicle by locking the doors and arming the alarm. |
| CONFIRMATION | • 1 chirp, display |
| COMMAND | Unlock & Disarm |
|---|---|
| BUTTON | |
| DESCRIPTION | Accesses your vehicle by unlocking the doors and disarming the alarm. |
| CONFIRMATION | • 2 chirps, display |
| COMMAND | Query* |
|---|---|
| BUTTON | |
| DESCRIPTION | Queries vehicle and vehicle battery voltage and interior temperature. |
| CONFIRMATION | • Query voltage: 1 chirp, display voltage ex: • Query temperature: 1chirp, display temperature ex: • Query shut down error: 3 chirps, display error ex: |
| COMMAND | Panic* |
|---|---|
| BUTTON | |
| DESCRIPTION | Triggers the panic siren. |
| CONFIRMATION | • 1 chirp, |
| COMMAND | AUX 5* |
|---|---|
| BUTTON | |
| DESCRIPTION | To be completed by Authorized Dealer if applicable |
| CONFIRMATION | • 1 chirp, display |
| COMMAND | Trunk Release* |
|---|---|
| BUTTON | |
| DESCRIPTION | Releases the trunk or hatch. |
| CONFIRMATION | • 1 chirp, display |
| COMMAND | Engine Start/Stop* |
|---|---|
| BUTTON | |
| DESCRIPTION | Starts and stops the engine. |
| CONFIRMATION | • Engine start: 1 chirp. • Engine run: 4 chirps, display • Start error: 1 long chirp, display start error ex: • Engine stop: 2 chirps. |
| COMMAND | AUX 1 |
|---|---|
| BUTTON | |
| DESCRIPTION | To be completed by Authorized Dealer if applicable |
| CONFIRMATION | • 1 chirp, display |
| COMMAND | AUX 2 |
|---|---|
| BUTTON | |
| DESCRIPTION | To be completed by Authorized Dealer if applicable |
| CONFIRMATION | • 1 chirp, display |
| COMMAND | AUX 3 |
|---|---|
| BUTTON | |
| DESCRIPTION | To be completed by Authorized Dealer if applicable |
| CONFIRMATION | • 1 chirp, display |
| COMMAND | AUX 4 |
|---|---|
| BUTTON | |
| DESCRIPTION | To be completed by Authorized Dealer if applicable |
| CONFIRMATION | • 1 chirp, display |
| COMMAND | 2nd Car Mode |
|---|---|
| BUTTON | |
| DESCRIPTION | Controls two iDatastart-equipped vehicles using one remote. Works with all functions marked with an asterisk (*). |
| CONFIRMATION | • Same as 1st car. |
| COMMAND | Silent Lock* |
|---|---|
| BUTTON | |
| DESCRIPTION | Disables the vehicle’s horn and alarm siren. |
| CONFIRMATION | • 1 chirp, display |
| COMMAND | Silent Unlock* |
|---|---|
| BUTTON | |
| DESCRIPTION | Disables the vehicle’s horn and alarm siren. |
| CONFIRMATION | • 2 chirps, display |
| COMMAND | Valet Mode ON/OFF |
|---|---|
| BUTTON | |
| DESCRIPTION | Turns off remote start and security features when servicing your vehicle or valet parking. Keyless entry features remains functional. |
| CONFIRMATION | • ON: 1 chirp, display • OFF: 2 chirps, |
| COMMAND | Runtime Extend |
|---|---|
| BUTTON | |
| DESCRIPTION | Seamlessly extends your engine runtime without restarting your vehicle. |
| CONFIRMATION | • 4 chirps, display runtime minutes ex: |
| COMMAND | Mute ON/OFF |
|---|---|
| BUTTON | |
| DESCRIPTION | Disables the vehicle’s horn and alarm siren even when alarm is triggered. Remote will still receive alarm notification. |
| CONFIRMATION | • ON: 1 chirp. • OFF: 2 chirps, display |
| COMMAND | Ignition Lock ON/OFF |
|---|---|
| BUTTON | |
| DESCRIPTION | Automatically locks doors when engine is running. |
| CONFIRMATION | • ON: 1 chirp, display • OFF: 2 chirps, display |
| COMMAND | Passive Lock & Arm ON/OFF |
|---|---|
| BUTTON | |
| DESCRIPTION | Automatically locks and arms your vehicle 60 seconds after you unlock it. |
| CONFIRMATION | • ON: 1 chirp, display • OFF: 2 chirps, display |
| COMMAND | Turbo ON/OFF |
|---|---|
| BUTTON | |
| DESCRIPTION | Cools down your turbo before turning the engine off. Programmable runtime from 30 seconds to 4 minutes. |
| CONFIRMATION | • ON: 1 chirp, display • OFF: 2 chirps, |
| COMMAND | Weather Start ON/OFF |
|---|---|
| BUTTON | |
| DESCRIPTION | Sets your vehicle to automatically remote start every 2, 3 or 4 hours (programmable) or from a temperature sensor sold separately. |
| CONFIRMATION | • ON: 1 chirp, display • OFF: 2 chirps, |
| COMMAND | Query Remote Technology |
|---|---|
| BUTTON | |
| DESCRIPTION | Shows the remote technology on LCD for 3 seconds. |
| CONFIRMATION | • Displays remote technology (ex: AM = |
| COMMAND | Query Remote Firmware Version |
|---|---|
| BUTTON | |
| DESCRIPTION | Shows the firmware version on LCD for 3 seconds. |
| CONFIRMATION | • Displays firmware version ex: |
| COMMAND | Lock Remote |
|---|---|
| BUTTON | |
| DESCRIPTION | Disables all functions on your remote. |
| CONFIRMATION | • ON: 1 chirp + LCD backlight flash 1 time. • On button press: 6 chirps + 6 times and remote LCD backlight flashes. |
| COMMAND | Unlock Remote ON/OFF |
|---|---|
| BUTTON | |
| DESCRIPTION | Enables all functions on your remote. |
| CONFIRMATION | • ON: 2 chirps + LCD backlight flash 2 times. |
| COMMAND | No beep on takeover |
|---|---|
| BUTTON | |
| DESCRIPTION | It will not beep on takeover |
| CONFIRMATION | • ON: 1 chirp • OFF: 2 chirps |
| COMMAND | Invert function of query remote start |
|---|---|
| BUTTON | |
| DESCRIPTION | It will invert function of query remote start |
| CONFIRMATION | • ON: 1 chirp • OFF: 2 chirps |
| COMMAND | Mute Remote ON/OFF |
|---|---|
| BUTTON | |
| DESCRIPTION | Disables the chime when pressing any button on your remote. |
| CONFIRMATION | • Chirp OFF: 2 chirps, display • Chirp ON: 1 chirp, displays |
| COMMAND | Remote Settings |
|---|---|
| CONTROLS |
• Press • Press • Press • Press |
| OPTIONS |
1. Set the clock’s hours 2. Set the clock’s minutes 3. Set the timer/alarm based on the clock 4. Set the backlight to ON/OFF 5. Set the vibration to ON/OFF 6. Set the chirp to ON/OFF 7. Exit the remote settings |
| COMMAND | Battery Level |
|---|---|
| DESCRIPTION | Shows the remote battery level. |
| DISPLAY |
|
In the event of an alarm, your iDatastart TR2550A remote will notify of the diagnostic you as follows:
1. Remote will chirp.
2. Red light will flash in the background.
3. ![]() will flash 5 times, then an alarm code (1 to 7) will be displayed:
will flash 5 times, then an alarm code (1 to 7) will be displayed:
| ALARM CODE | DIAGNOSTIC |
|---|---|
| Shock is detected | |
| Door is open | |
| Trunk is open | |
| Hood is open | |
| Zone 2 | |
| Brake is detected | |
| Ignition is detected |
Are you replacing a lost or damaged remote or simply adding an extra remote to your iDatastart system?
Please take note of the following:
1. A functional iDatastart system must already be installed in your vehicle.
2. All new remotes must be installed by an iDatastart Authorized Dealer.
3. A maximum of 4 remotes can be programmed to your iDatastart system.
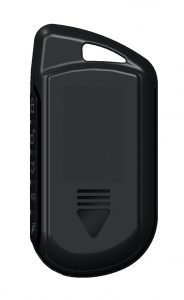
Follow the steps below to replace the batteries in your iDatastart remote:
1. On the backside of your remote, press and slide the lid downwards to expose the batteries.
2. Remove the old batteries and replace by two new CR2450 batteries.
3. Close the lid on the backside of the remote.
Your iDatastart system may enable remote engine start by performing one of the following button sequences on your factory key fob:
| BUTTON | FUNCTION |
|---|---|
| Press on |
Start engine |
| Press on |
Stop engine |
OR
| BUTTON | FUNCTION |
|---|---|
| Press on |
Start engine |
| Press on |
Stop engine |
NOTE: This feature may not be supported on some vehicles. If supported, the chosen button sequence will be communicated to you by your iDatastart Authorized Dealer at the time of installation. The remote start range will be equal to your factory key fob’s door lock range.
Once remote started from your factory key fob or long-range remote, your vehicle will run for the programmed ‘runtime’ setting. The default runtime is 15 minutes but it can also be programmed for 3, 5, 10, 25, 30 or 35 minutes. If you wish to change your remote start runtime setting, contact your iDatastart Authorized Dealer.
The ‘key takeover’ procedure ensures that your engine does not shut down upon entering the vehicle, during the programmed remote start runtime. To prevent your vehicle from shutting down, complete the steps below within the programmed delay time (45 seconds, 90 seconds, 3 minutes or 4 minutes):
For Standard Key Vehicles
1. Unlock and enter vehicle
2. Close doors
3. Insert key into ignition and turn ignition to ON position
4. Press foot brake
For Push-To-Start Vehicles
1. Unlock and enter vehicle with valid smartkey
2. Close doors
3. Press foot brake
NOTE: This feature may not be supported on some vehicles. If available, the programmed ‘key takeover’ delay time will be communicated to you by your iDatastart Authorized Dealer at the time of installation.
To ensure safety during vehicle servicing, the remote starter must be placed in ‘Valet Mode’. The ‘Valet Mode’ will disable remote start functionality. To activate or deactivate the ‘Valet Mode’, follow the instructions below:
With Vehicle Key:
Cycle ignition OFF/ON 2x rapidly, then press brake 3x.
| FUNCTION | # OF PARKING LIGHT FLASHES |
|---|---|
| Valet Mode ON | 1 |
| Valet Mode OFF | 2 |
With iDatastart Remote:
Turn ignition ON, then press ![]()
![]()
![]()
![]()
![]()
| FUNCTION | # OF PARKING LIGHT FLASHES |
|---|---|
| Valet Mode ON | 1 |
| Valet Mode OFF | 2 |
With iDatastart Antenna:
Turn ignition ON, then press & hold button for 5 seconds
| FUNCTION | # OF PARKING LIGHT FLASHES |
|---|---|
| Valet Mode ON | 1 |
| Valet Mode OFF | 2 |
If your iDatastart remote fails to start the vehicle, the parking lights will flash three times immediately, then flash a number of times according to the errors below:
| # OF PARKING LIGHT FLASHES | DIAGNOSTIC | SOLUTION |
|---|---|---|
| 3 + 1 | Need to learn tach | |
| 3 + 2 | Key in ignition at ON position | Remove key from ignition |
| 3 + 3 | Door is open | Close door |
| 3 + 4 | Trunk is open | Close trunk |
| 3 + 5 | Brake is detected | Release brake |
| 3 + 6 | Hood is open | Close hood |
| 3 + 7 | Reservation not done (manual only) | Perform reservation procedure |
| 3 + 8 | Tach failure | Contact Authorized Dealer |
| 3 + 9 | VSS detected (vehicle in movement) | Contact Authorized Dealer |
| 3 + 10 | System is in Valet Mode | Exit Valet Mode |
| 3 + 11 | Can communication failure | Contact Authorized Dealer |
| 3 + 12 | Can communication failure | Contact Authorized Dealer |
| 3 + 13 | Bypass error | Contact Authorized Dealer |
| 3 + 14 | No Pitstop or Takeover available | Contact Authorized Dealer |
| 3 + 15 | Module overheat protection | Contact Authorized Dealer |
If the remote start sequence has been completed and the vehicle shuts down, the vehicle’s parking lights
will flash 4 times immediately, then flash a number of times according to the errors below:
| # OF PARKING LIGHT FLASHES | DIAGNOSTIC | SOLUTION |
|---|---|---|
| 4+1 | No engine rev detected | Contact Authorized Dealer |
| 4+3 | Brake detected | Release brake |
| 4+4 | Hood open detected | Close hood |
| 4+5 | Engine revving over 3000 RPM | Check your accelerator pedal |
| 4+6 | Glow plug error | Contact Authorized Dealer |
| 4+7 | Vehicle speed sensor error | Contact Authorized Dealer |
| 4+8 | ‘Check Engine’ light detected | Clear ‘Check Engine’ code |
| 4+9 | Low fuel detected | Add fuel |
| 4+10 | Door open detected | Close door |
| 4+11 | CAN communication failure | Contact Authorized Dealer |
| 4+12 | Key synchronisation failure | Contact Authorized Dealer |
| 4+13 | Bypass error | Contact Authorized Dealer |
| 4+14 | No Pitstop or Takeover available | Contact Authorized Dealer |
| 4+15 | Module overheat protection | Contact Authorized Dealer |
| # PARKING LIGHT FLASHES | DIAGNOSTIC |
|---|---|
| 5 + 1 | Shock sensor triggered |
| 5 + 2 | Door open |
| 5 + 3 | Trunk open |
| 5 + 4 | Hood open |
| 5 + 5 | Zone 2 input triggered |
| 5 + 6 | Foot brake ON |
| 5 + 7 | Ignition ON |
| 5 + 8 | Motion detected |
| 5 + 9 | Tilt detected |
| 5 + 10 | Warn away input triggered |
| 5 + 11 | Glass break detected |
| 5 + 12 | Radar - Interior |
| 5 + 13 | Radar - Exterior |
| 5 + 14 | Voltage sensing |
| # ANTENNA LED FLASHES | DIAGNOSTIC |
|---|---|
| 1 | Shock sensor triggered |
| 2 | Door open |
| 3 | Trunk open |
| 4 | Hood open |
| 5 | Zone 2 input triggered |
| 6 | Foot brake ON |
| 7 | Ignition ON |
| 8 | Motion detected |
| 9 | Tilt detected |
| 10 | Warn away input triggered |
| 11 | Glass break detected |
| 12 | Radar - Interior |
| 13 | Radar - Exterior |
| 14 | Voltage sensing |
Automotive Data Solutions Inc. (“ADS”) warrants to the original purchaser of the iDatastart product that the following components product shall be free of defects in material and workmanship under normal use and circumstances:
Control module and installation harnesses
For as long as the original purchaser owns the vehicle in which it was originally installed.
Remote transmitters and antenna
For the period of one (1) year from the date of original installation.
Excludes battery replacement.
In the event of any product malfunction during the Warranty period, the original purchaser must return to the Authorized Dealer where it was originally purchased with the original proof of purchase. If a malfunction is detected, the Authorized Dealer will elect to repair or replace the product at its discretion. Labor costs may be applicable and are at the discretion of the Authorized Dealer.
The Limited Lifetime Warranty is automatically void if:
• An original proof of purchase is not provided when servicing the product during the warranty period;
• The date code and/or serial number is defaced, missing, or altered;
• The iDatastart product is transferred to another vehicle;
• The vehicle in which the product was originally installed is transferred to a new owner.
ADS is not responsible for any damages whatsoever, including but not limited to any consequential damages, incidental damages, damages for loss of time, loss of earnings, commercial loss, loss of economic opportunity and the like that may or may not have resulted from the installation or operation of an iDatastart product. Purchasers sole contractual remedy is refund of the purchase price of the ADS product(s).
1. This device complies with Part 15 of the FCC Rules. Operation is subject to the following two conditions:
(1) This device may not cause harmful interference.
(2) This device must accept any interference received, including interference that may cause undesired operation.
2. Changes or modifications not expressly approved by the party responsible for compliance could void the user’s authority to operate the equipment.
NOTE: This equipment has been tested and found to comply with the limits for a Class B digital device, pursuant to Part 15 of the FCC Rules. These limits are designed to provide reasonable protection against harmful interference in a residential installation.
This equipment generates uses and can radiate radio frequency energy and, if not installed and used in accordance with the instructions, may cause harmful interference to radio communications. However, there is no guarantee that interference will not occur in a particular installation. If this equipment does cause harmful interference to radio or television reception, which can be determined by turning the equipment off and on, the user is encouraged to try to correct the interference by one or more of the following measures:
• Reorient or relocate the receiving antenna.
• Increase the separation between the equipment and receiver.
• Connect the equipment into an outlet on a circuit different from that to which the receiver is connected.
• Consult the dealer or an experienced radio/TV technician for help.
This device complies with Industry Canada licence-exempt RSS standard(s). Operation is subject to the following two conditions:
(1) This device may not cause interference.
(2) This device must accept any interference, including interference that may cause undesired operation of the device.
CAN ICES-3 (B)/NMB-3(B)
Your wireless REMOTE CAR STARTER (TWO WAY) is a radio transmitter and receiver. It is designed and manufactured not to exceed the emission limits for exposure to radio frequency (RF) energy set by the Federal Communications Commission of the U.S. Government. These limits are part of comprehensive guidelines and establish permitted levels of RF energy for the general population. The guidelines are based on standards that were developed by independent scientific organizations through periodic and
thorough evaluation of scientific studies. The standards include a substantial safety margin designed to assure the safety of all persons, regardless of age and health.
The exposure standard for wireless REMOTE CAR STARTER (TWO WAY) employs a unit of measurement known as the Specific Absorption Rate, or SAR. The SAR limit set by the FCC is 4.0 W/kg. Tests for SAR are conducted with the REMOTE CAR STARTER (TWO WAY) transmitting at its highest certified power level in all tested frequency bands. Although the SAR is determined at the highest certified power level, the actual SAR level of the REMOTE CAR STARTER (TWO WAY) while operating can be well below the maximum value. This is because the REMOTE CAR STARTER (TWO WAY) is designed to operate at multiple power levels so as to use only the power required to reach the network.
In general, the closer you are to a wireless base station antenna, the lower the power output. Before a REMOTE CAR STARTER (TWO WAY) model is available for sale to the public, it must be tested and certified to the FCC that it does not exceed the limit established by the government adopted requirement for safe exposure. The tests are performed in positions and locations (e.g., at the ear and worn on the body) as required by the FCC for each model. The highest SAR value for this model REMOTE CAR STARTER (TWO WAY) when tested for use at the extremity is 0.030W/Kg.
While there may be differences between the SAR levels of various REMOTE CAR STARTER (TWO WAY) and at various positions, they all meet the government requirement for safe exposure. The FCC has granted an Equipment Authorization for this model REMOTE CAR STARTER (TWO WAY) with all reported SAR levels evaluated as in compliance with the FCC RF exposure guidelines. SAR information on this model REMOTE CAR STARTER (TWO WAY) is on file with the FCC and can be found under the Display Grant section of
http://www.fcc.gov/oet/fccid after searching on the Grantee Code: 2AEPJ. Additional information on Specific Absorption Rates (SAR) can be found on the Cellular Telecommunications Industry Association (CTIA)
website at http://www.wow-com.com.*
In the United States and Canada, the SAR limit for REMOTE CAR STARTER (TWO WAY) used by the public is 4.0 watts/kg (W/kg) averaged over one gram of tissue. The standard incorporates a substantial margin of safety to give additional protection for the public and to account for any variations in measurements.
This device complies with FCC and ISED 10-g extremity SAR requirements when the device is used at 0 mm separation.
Changes or modifications not expressly approved by the party responsible for compliance could void the user’s authority to operate the equipment.